Creating a web app admin user interface in Photoshop can seem like a daunting task, but with the right tools and techniques, it is possible to create a sleek and intuitive design. The first step in creating an admin user interface is to identify the key features that will be included in the design. This might include things like menus, search bars, buttons, and forms.
Once you have identified the key features of your admin user interface, it’s time to start designing. One of the most important aspects of any web app design is usability. Make sure that your design is intuitive and easy to navigate for users of all skill levels. This might mean using familiar icons and labels for common functions or grouping related functions together.
Another important aspect of creating an admin user interface in Photoshop is keeping your design consistent across different pages or sections of your web app.
Web App Admin User Interface in Photoshop
Web applications are popular thanks to the ubiquity of web browsers. the power to update and maintain web applications without distributing and installing software on potentially thousands of client computers may be a key reason for their popularity.
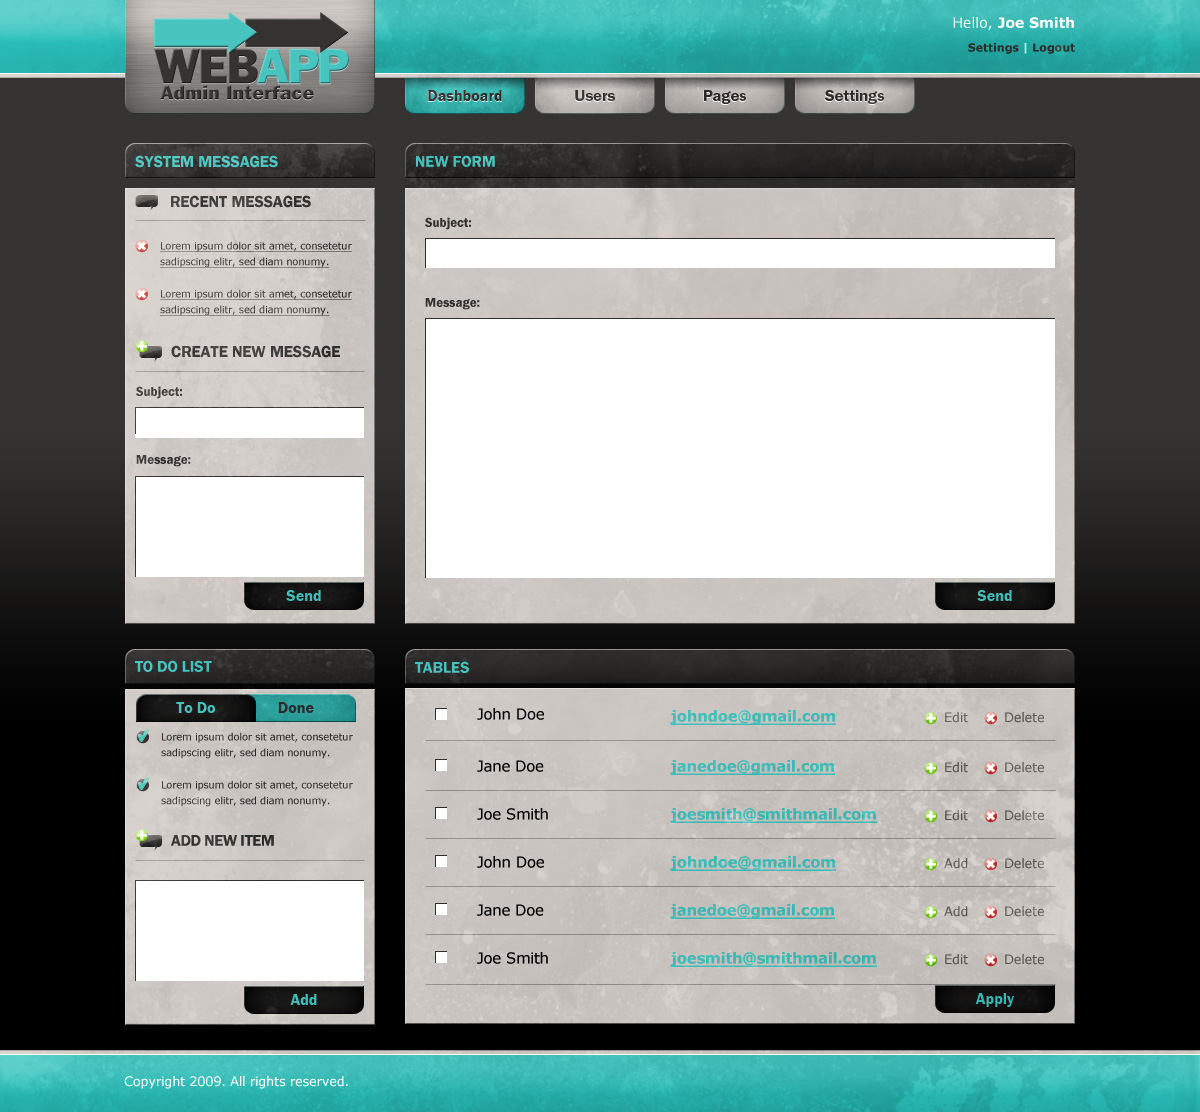
A modern and straightforward to use Admin interface is the key to the success of web applications. We are getting to show you ways to make an internet Application Admin user interface in Photoshop. in order that you’ll easily create your own admin interface for your web applications. outcome This Web Application Admin interface is what we are close to making.
Final Result This Web Application Admin User Interface is what we are about to make. You can click on the image to see a full-scale version.

Background Step 1 Create a new document in Photoshop that is 1200×1112px. Fill the background with black (#000000). Using a Linear Gradient and a dark gray (#333333), click and drag it from the top down. You want your gradient to end about halfway down the document.

Header Step 2 Using the marquee tool we are going to make a 1200×77px box. To do this click on the marquee tool and change the style settings to Fixed Size. Change the size to 1200×77px and click on the top left corner of the document for a starting point. Fill with #33CCCC.

Step 3 Now we are going to add a Gradient Overlay to our header. Click on the first icon from the left on the bottom of the layers palette, and click on Gradient Overlay.

Step 4 Using the line tool, create a 5px line going across the entire document. This is going to go at the bottom of our header. Change the color to #CCCCCC. Now we are going to create a bevel look to it. Click on the Single Row Marquee Tool, and create a line on the top of our 5px line we just created. Fill that selected area with #FFFFFF. Create another line at the bottom and fill with #999999 Finally add another Single Row Marquee to the very top of the document using #009999.

Step 5 We want to create a 950px box in the middle of the document, which we are going to build our interface around. To do this first click on the background layer then go to View>Snap and make sure it is checked. Now click and drag a guide out from the ruler to the middle of the document. When you get to the middle the guide should snap into place.
Now using the Square Marquee tool create a new layer (Control + Shift + N), and create a square that is 950px wide and 1112px tall. Fill with #FFFFFF. When you use the transform tool (Control + T) there will be anchor that come up on the corners and in the middle, line up the top and bottom middle anchor points with the guide.
Take that guide that you created and drag it over to the right side of the box we created (it should snap into place). Also, click and drag another guide to the left of the box. Now click and drag the box layer into the trash (last icon on the right at the bottom of the layers palette).

Step 6 While we are at it, we are going to add some more guides to get the basic layout of our design. Using your square marquee tool create a box 250×1112px so that the left edge is on the left guide. Click and drag a guide out to the right side of the selected area. Holding down shift, move the box over to the left once with the left arrow.
Put a guide on the right side of the selection. Hold shift again, and move the box over to the right twice. Put a guide on the left side of the selection. Move the box over two more times, holding shift, and put another guide on the right side of the box. Now we are going to make another box that is 950×113px. Put it at the very top and put a guide at the bottom of the box.

Step 7 Before we go any further we want to start organizing our layers. So create a new folder (third icon from the left at the bottom of the layers palette) and call it “Header” Using the rounded rectangle tool, create a box with a radius of 10px that goes from the left guide to the fourth guide in, and down to the guide that goes across. Fill with #CCCCCC.

Step 8 Using the layer styles (first icon at the bottom of the layers palette) click on Inner Shadow. This will give us a dark look on the edges. Next, we are going to add a Bevel and Emboss. This will make our box pop, kind of like we did with border on the header. Finally, we are going to add a Gradient Overlay. This will give us a dark edge on the bottom of our box.
Step 9 Now you can add in your logo, and give it the same Bevel and Emboss as the box. You can do this by dragging the style from the box layer to the logo layer. To give it an extra embossed look, you can first duplicate your logo with Control + J. Control and click on the logo and fill it with #CCCCCC. Move that layer down two spaces.

Step 10 We are going to give the box a metal look to it. To do this we are going to create a new layer, then create a box using the marquee tool and fill it with black. The size doesn’t really matter, as long as it is bigger than our box. Make sure your foreground and background colors are black and white, then go to Filter>Noise>Add Noise. Change your settings to something like what I have. Using Control + U drop the saturation all the way down to -100. Do Control + D to deselect the area, then go to Filter>Blur>Motion Blur.
Move the metal we are creating over the original box. Then do Control + click on the original box layer, the do Control + Shift + I to get the inverse and delete. Change the blend mode to Soft Light. Open up the levels menu with Control + L and bring in the left and right arrows towards the edges of the graph. Then drop the Opacity way down until you get something you like. I put mine at 20%.

Step 11 Let’s add some navigation. To do this we are first going to add another guide. Using the square marquee tool create a square that is 120px wide and put the left edge on the last guide on the left side of the document. Drag a guide over to the right of the box.
In that box we are going to take the Rounded Rectangle Tool and create a box in that area, except make sure that to top of the box, including the rounded corners goes above the header. Create a new folder and call it “Nav”. Change the color of the box to #33CCCC, and drag the layer into the folder. Move the folder below the header.

Step 12 The first button is going to be our “Dashboard” button, so create a new folder inside the “Nav” folder, and call it “Dashboard”. Now we are going to add some layer styles to our button. So lets add an Inner Glow, and Bevel and Emboss. This will really make our button pop.

Step 13 Let’s add some text to our button. Use the Type Tool, to type out the word “Dashboard”. I am using the font ITC Franklin Gothic Demi at 16pt. Make sure you make your text box the same width as the navigation button and center the text.

Step 14 Duplicate the text layer with Control + J and change the color to #CCCCCC. Move it down two spaces. This will give us a bevel for the navigation words. Lastly we are going to add a shadow at the top of our button. To do this Control and click on the button layer to get the selection, then create a new layer with Control + Shift + N. Now click on the gradient tool and make sure you have the Linear Gradient selected, as well as black as your foreground. Click and drag a gradient from top to bottom until you get something you like.

Step 15 Right click on the “Dashboard” folder and click on Duplicate Layer Set. Rename the folder “Users”. Holding down Shift, move the button over 13 spaces. This should put it just off the original button. Change both the text layers to say “Users” and change the background to #CCCCCC. Repeat this with “Pages” and “Settings”. So you should end up with four buttons total.

Step 16 Now we are going to add the login information at the right of our webpage.

SidebarStep 17 Now it is time to start on the sidebar. First lets start off by taking the Rounded Rectangular Tool, click and drag a square the same width as the logo box and a height something like what I have (it doesn’t have to be a certain height because we are going to mask it off). Make sure the top is resting on the horizontal guide. Fill it with #FFFFFF for now. Click on the layer mask (Second icon from the left on the layers palette).
Click on the square marquee tool and create a square 250×35px and put it on the far left and horizontal guides. Get the inverse selection with Control + Shift + I and fill the area with black. This should get rid of the area we don’t need. We are going to add the headline, so using the Type Tool, type out “System Messages”. Move the text to the far left guide then holding down shift, move it over to the right one space.

Step 18 We are going to add some layer styles to our sidebar head, but before we do that we want to create a new folder and call it “System Messages”. Now go into the layer styles and add a Bevel and Emboss, also we are going to give it a Gradient overlay. Go ahead and change the color of the box to #333333. Holding down Shift, move the box down three times.

Step 19 Using the Square Marquee tool, create a square, 250×435px. Line it up at the far left and horizontal guides. Create a new layer with Control + Shift + N and fill it with #CCCCCC. Add a Bevel and Emboss and holding shift, move the box down seven spaces.

Step 20 Repeat step 17, change the headline to “To Do List” and put the layers into a new folder called “To Do List”.

Step 21 We are going to repeat step 19, except the box is going to line up with the left guide and the bottom of the “To Do List” head. Change the height to 340px and move the box down five spaces from that spot.

Step 22 Now we can start creating the information inside the first sidebar. Let’s start off by grabbing the talk bubble icon. I’ve created a transparent PNG of all the icons so you can use them. Duplicate the “System Messages” headline and change the color to #333333. and change it to “Recent Messages”. Put your talk bubble next to the text and line up the icon with the left guide. Hold down shift and move it over one spot.

Step 23 Let’s go in and add a break under the “Recent Messages”. To do this, click on the Line Tool and create a 1px line in between the inner two sidebar guides. Now grab the red “x” icon and set it one Shift + space over from the left side of the sidebar. Add some dummy text: “Lorem ipsum dolor sit amet, consetetur sadipscing elitr, sed diam nonumy.”
Change the font to Verdana, font size to 10pt and the color to #333333. To underline it (because these will be links) highlight the text and open up the text options with Control + T, then select the underline option. Put the icon and dummy copy into a folder called “Message 1”.

Step 24 Repeat step 23, and put the layers in a folder called “Message 2”.

Step 25 To add the message form we are first going to create a headline. Duplicate the “Recent Messages” folder and replace the talk bubble icon with the talk bubble and the green “+” icon. Hold down shift and move it down fifteen spaces. Also, duplicate the line break and move it one shift + space down from the bottom of the “Created New Message” head.

Step 26 Now to add the form, create a new folder called “Message Form”. Using the type tool Write out “Subject:”. I’m using ITC Franklin Gothic Demi at 13pt. Create a 229×30px box using the square marquee tool and fill with #FFFFFF.

Step 27 Now we are going to give the box a bevel. To do this we are going to duplicate the white box with Control + J. Control and click on the layer, then fill with #333333. Now make sure you have the marquee tool clicked, and move down and right one space each. Then delete the selected area.

Step 28 Repeat steps 26 & 27 except the white box is going to be 229×100px and instead of “Subject:” it is going to say “Message:”.

Step 29 Now we are going to create the “Send” button. Duplicate the “Users” folder from the navigation buttons, and bring it down five spaces below our form. Click and drag the shadow layer and the light gray text layers from the navigation into the trash can. Change the color of the button to #333333 and the text to #33CCCC. Change the text to say “Send”.
Add a layer mask to the button. Now take your marquee tool and create a box so the bottom of the box is at the bottom of the message form. Move the marquee box down five spaces and fill with black. Move the text down four spaces.

Step 30 Repeat steps 17-19, except change the box size to 250×336px. Now for the bottom sidebar, we want to duplicate the two message folders and bring them into our “To Do List” folder. Shift and move the text down four times. Unclick the underline options on the text and replace the “x” icons with the “check” icons.

Step 31 We are going to add the “To Do” and “Done” tabs at the top of this part of the sidebar. Duplicate the “Send” button folder and change the name to “To Do”. Go into that folder and find the actual button. We are going to go to rotate it 180 degrees. Bring the tab down to our sidebar and move it down five spaces and rest it on the second guide from the left.

Step 32 Duplicate the “To Do” folder and rename it “Done”. Change the color to #33CCCC and the text to #333333. Hold Shift and move the “Done” button nine times. Duplicate one of your line breaks and move it so it is resting on the bottom of the tabs.

Step 33 Duplicate the “Create New Message” folder and rename it “Add New Item”. Change the text to “Add New Item” also. Make sure you duplicate the line break also. Hold down shift and hold this headline down fourteen times.

Step 34 Duplicate the message part of the form and the send button. Bring them into our “To Do List” folder (minus the “Message:”). Hold down shift and move down two spaces from the line break. Change the button from “Send” to “Add”. That will do it for our sidebar.

MainStep 35 Repeat steps17-19, except instead of a width of 250px make it 670px. Change the headline to “New Form”.

Step 36 Now add the form to our main section. To do this we are going to repeat steps 26 & 27. The size of the Subject part of the form is going to be 630×30px. Hold down shift and move the box down five times. Above the box we are going to create a headline called “Subject” by duplicating the “Subject” from the sidebar.

Step 37 We are going to add another box for the “Message”. Again, repeat steps 26 & 27. This box will be 630×260px. Duplicate the “Message:” from the sidebar. Duplicate the “Send” button from the side bar and line it up with the right side of the box.

Step 38 Repeat steps 17-19 to get the header and table. The table will be 670×336px.

Step 39 Now we are going to duplicate the “Add” button from the bottom side bar and bring it over to our “Tables” box. Change the text so it says “Apply”. Line up the button at the bottom right, then hold shift and move the button up one and to the left twice.

Step 40 Create a new folder called “Names” and we are going to add the first line of the table. First we are going to add a check box. To do this we are going to repeat steps 26 & 27, except the box is going to be 12×12px. Hold down shift and move the check box from the top left corner, over three spaces and down two.

Step 41 Now put any name you want. I’m going to set mine at 15pt with Verdana as the font. Hold down shift and move it over three spaces from the check box. Take the “+” icon and the “x” icon and bring the into our “Tables” folder. Add “Edit” to the “+” icon and “Delete” to the “x” icon. Change the color of the text to #666666. Move that whole group over three spaces from the right, holding shift.
Add the e-mail address in the middle of the name and “Add” with a bold #CC3333 Verdana. Add a break below the name line. This is going to be the same size as the form in the “New Form” box.

Step 42 Duplicate the “Name” folder five more times, spreading them out so the last one ends one space above the tabs.

Step 43 Click on the very top layer, then click on the fourth icon from the left at the bottom of the layers palette. Open up the Photo Filter and change the filter to Sepia.

Step 44 To create the footer, we are simply going to duplicate the “Header” folder and drag everything to the trash except for the #CC3333 and white bars. Rotate that folder 180 degrees and bring it all the way down to the bottom of our document. Add your footer information in the bottom left corner.

Step 45 To give the website a grungy look we are going to go and download a texture from Zen Textures (http://www.unsigneddesign.com/film/4.jpg). Bring the texture into our document ad size it so it fits the entire area. Change the blend mode to Soft Light, and drop the opacity down to 50%. Hold down control and click on the background and header for each sidebar and main section, navigation and the green header.
Get the inverse selection with Control + Shift + I and delete. Control and Click on the box around the logo and fill the mask on the texture with black. This will get rid of the texture on that box. Finally we want to get rid of the texture in the gaps between the headers and the #CCCCCC background.

Final Result If you followed throgh the tutorial, you should end up with something like this.
Hope you enjoy this tutorial. Please feel free to leave a comment and tell us your opinion. Would you like more Photoshop tutorials like this? Don’t forget to check webappers’s website for more tutorials like this.
In conclusion, creating a web app admin user interface in Photoshop is an achievable task. Through the use of layers, shapes, and colors, you can create a visually appealing design with relative ease. Don’t be intimidated by the size of the project; break it down into smaller tasks and work your way through them one step at a time. Additionally, refer to tutorials and other resources to ensure you are using the correct tools and techniques.
Source: webappers