<p>Looking to add a touch of nostalgia to your computer desktop? Why not try creating your own vintage movie intro wallpaper in Photoshop. Not only is it a fun and creative project, but it also adds a unique and personal element to your workspace.</p><p>Once completed, save the image as your desktop wallpaper and enjoy the retro vibes every time you log on to your computer. With just a little bit of creativity and skill in Photoshop, you can have an eye-catching desktop that reflects your love for classic cinema.</p><p>Vintage style is a favorite source of inspiration for designers and can be seen in type, illustration and web design anywhere you look. As the decade progress, “vintage” takes on a different meaning. The 1930s is one of my favorite eras and features pioneers of many of the typefaces, technologies and art styles we appreciate most today. </p><p>

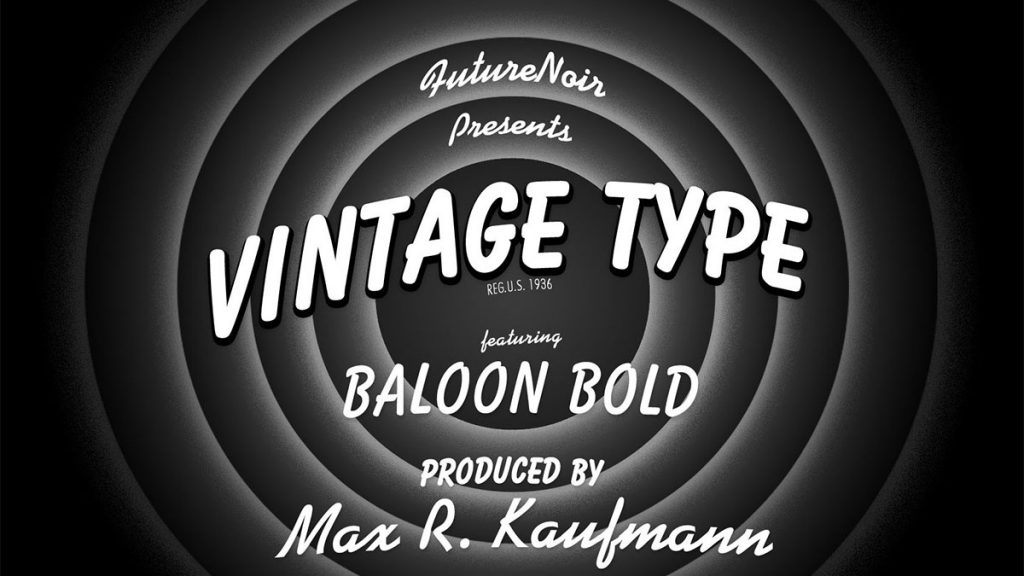
Here is a preview of what you will be creating:

</p><div class="wp-block-image"><figure class="aligncenter"><img src="https://www.webdesign.org/img_articles/20670/01.jpg" alt="Vintage Movie Intro Wallpaper in Photoshop"/></figure></div><p> Font Resources: <a rel="nofollow noopener noreferrer" href="http://new.myfonts.com/search/kaufmann/" target="_blank" class="rank-math-link">Kaufmann</a> (full) <a rel="nofollow noopener noreferrer" href="http://www.linotype.com/386683/sgballoonsb-family.html" target="_blank">Balloon (full)</a><a rel="nofollow noopener noreferrer" href="http://www.ffonts.net/Bazooka-Regular.font" target="_blank">Bazooka (free)</a></p><h2 class="wp-block-heading">Vintage Movie Intro Wallpaper in Photoshop</h2><p>Are you a fan of vintage movies and their iconic intros? Do you want to capture that nostalgia in your computer screen? Look no further because with <a href="http://blog.visibledev.net/category/tutorials/adobe-photoshop/">Photoshop</a>, you can create your own Vintage Movie Intro Wallpaper. This tutorial will guide you through the steps on how to achieve that classic look.</p><h3 class="wp-block-heading">Step 1</h3><p>
Launch Photoshop and click on &#8220;File >; New >; Document.&#8221; Give your document a name and choose the &#8220;Web&#8221; preset. I selected &#8220;1600 x 1200? for the Size, but you can choose whatever size you like.

</p><div class="wp-block-image"><figure class="aligncenter"><img src="https://www.webdesign.org/img_articles/20670/02.jpg" alt="img"/></figure></div><p> Make sure your rulers are visible along the top and sides of your workspace. If they aren&#8217;t, click on &#8220;View >; Rulers.&#8221; Set a vertical guide by clicking on the left ruler and dragging the guideline to the 800px mark on the top ruler. Repeat to set a horizontal guide, dragging a guideline from the top ruler down to the 600px mark of the left ruler. This gives you a general guideline for where the center is. Guides can be turned on and off using <strong>Cmd+; </strong>(MAC) or <strong>Ctrl+;</strong> (PC). </p><div class="wp-block-image"><figure class="aligncenter"><img src="https://www.webdesign.org/img_articles/20670/03.jpg" alt="img"/></figure></div><h3 class="wp-block-heading">Step 2</h3><p>
Choose the <strong>Bucket Tool </strong>and set your foreground color to black. Fill the document so your first layer is completely black.

Ensure your Layer panel is visible and create a new layer.

</p><div class="wp-block-image"><figure class="aligncenter"><img src="https://www.webdesign.org/img_articles/20670/04.jpg" alt="img"/></figure></div><h3 class="wp-block-heading">Step 3</h3><p>
Choose the <strong>Ellipse Tool</strong> by right-clicking on the <strong>Rectangle Tool</strong> in your left toolbar. Set the foreground color to white and draw a medium-sized circle in the center of your document. Don&#8217;t worry if it is not perfectly centered, but try to make it as perfect a circle as you can.

Use the <strong>Move Tool </strong>to reposition the circle about 2/3 below the horizontal line. Center the circle by lining up the center nodes with the vertical guide.

</p><div class="wp-block-image"><figure class="aligncenter"><img src="https://www.webdesign.org/img_articles/20670/05.jpg" alt="img"/></figure></div><h3 class="wp-block-heading">Step 4</h3><p>
Double-click the circle layer and select the <strong>Gradient Overlay</strong>.

Choose &#8220;Radial&#8221; from the Style menu and. check &#8220;Reverse&#8221; Reduce the Opacity to about 85%.

</p><div class="wp-block-image"><figure class="aligncenter"><img src="https://www.webdesign.org/img_articles/20670/06.jpg" alt="img"/></figure></div><div class="wp-block-image"><figure class="aligncenter"><img src="https://www.webdesign.org/img_articles/20670/07.jpg" alt="img"/></figure></div><h3 class="wp-block-heading">Step 5</h3><p>
Right-click the circle layer and choose &#8220;Duplicate Layer.&#8221; Click on the original layer, which should now be below the duplicate. Use the Move Tool to expand its diameter until it is about 200 pixels larger than the second circle. Double-click the layer and change the Opacity to 100% and the Scale to about 120%.

Repeat this step two more times to create four circle layers, each larger than the one above it, increasing the gap slightly as you get larger. Use the Move Tool to scale the circles until you have a look similar to this example:

</p><div class="wp-block-image"><figure class="aligncenter"><img src="https://www.webdesign.org/img_articles/20670/08.jpg" alt="img"/></figure></div><p>

Double-click the largest circle layer and click on the Gradient Overlay effect. Reduce the Scale to 110% to produce a nice fade into the background:

</p><div class="wp-block-image"><figure class="aligncenter"><img src="https://www.webdesign.org/img_articles/20670/09.jpg" alt="img"/></figure></div><h3 class="wp-block-heading">Step 6</h3><p> Click the top-most circle layer and create a new layer, which should now be on top. Set the foreground color to <strong>#151515</strong> and use the <strong>Ellipse Tool </strong>to draw a small &#8220;hole&#8221; in the center of your rings. Use the <strong>Move Tool</strong> to scale and position it until it is centered and of a balanced size. Reduce the layer opacity to 85% to give it a little dimension. Double-click the &#8220;hole&#8221; layer and select &#8220;Outer Glow.&#8221; </p><p>Click the color swatch and choose a slight off-white, such as #f1f1f1. Increase the size to 54px, Spread to 2%, Noise to 15% and Opacity to 50%. This gives the surrounding ring a contour while the noise adds a bit of a vintage film feel. </p><div class="wp-block-image"><figure class="aligncenter"><img src="https://www.webdesign.org/img_articles/20670/10.jpg" alt="img"/></figure></div><p>

This is the primary effect you will use to create the &#8220;film barrel&#8221; illusion that was popular in vintage intros.

Apply this effect to the other circle layers, varying your Size, Noise and Opacity to get the desired look. As you can see in my example, the outer-most ring uses a lower opacity to make it appear farther away from the light source in the center.

</p><div class="wp-block-image"><figure class="aligncenter"><img src="https://www.webdesign.org/img_articles/20670/11.jpg" alt="img"/></figure></div><h3 class="wp-block-heading">Step 7</h3><p>
Set your foreground to white. Choose the<strong> Text Tool </strong>and set your font to Kaufman Bd BT, 60pt, centered. Add your &#8220;Presents&#8221; text above the hole, and position it within the first ring.

Click the &#8220;Create Warped Text&#8221; button in your Text Options Toolbar and select &#8220;Arch&#8221; from the Style menu.

</p><div class="wp-block-image"><figure class="aligncenter"><img src="https://www.webdesign.org/img_articles/20670/12.jpg" alt="img"/></figure></div><p>

You can also access these options with the <strong>Move Tool</strong> when Transform is enabled by clicking the Warp button and selecting a style from the Warp menu:

</p><div class="wp-block-image"><figure class="aligncenter"><img src="https://www.webdesign.org/img_articles/20670/13.jpg" alt="img"/></figure></div><p>

Left-click the node and drag to bend the text so it follows the curve of the ring:

</p><div class="wp-block-image"><figure class="aligncenter"><img src="https://www.webdesign.org/img_articles/20670/14.jpg" alt="img"/></figure></div><h3 class="wp-block-heading">Step 8</h3><p>
Return to the <strong>Text Tool</strong> and select your Balloon or Bazooka font. Set it to about 200pt and draw a large text box across the upper half of the hole. Type &#8220;Vintage Text,&#8221; as shown the example, or whatever you wish. Adjust the font size and text box so it fits comfortably on one line.

Use the Warp technique to give this line a slight curve. Use the <strong>Move Tool </strong>and click the corner to enable your transform options. Right-click the node and choose &#8220;Rotate.&#8221; Left-click and drag to rotate the text a bit to the left.

</p><div class="wp-block-image"><figure class="aligncenter"><img src="https://www.webdesign.org/img_articles/20670/15.jpg" alt="img"/></figure></div><p>

Right-click this layer and choose &#8220;Duplicate Layer.&#8221; To create the large, bold shadow, it is easier to use a second text layer than a drop shadow effect, which is a bit too limited for this look. Use the Text Tool to set this layer&#8217;s text to black. Double-click the layer and select &#8220;Stroke.&#8221; Click the color swatch to choose black, and set the Size to 9px.

Select &#8220;Drop Shadow&#8221; and set the Distance to 1px, Spread to 11% and Size to 18px. This gives the edges of our new &#8220;shadow&#8221; a softer edge.

</p><div class="wp-block-image"><figure class="aligncenter"><img src="https://www.webdesign.org/img_articles/20670/16.jpg" alt="img"/></figure></div><p>

Use the <strong>Move Tool</strong> to offset this text from the white text to produce the shadow:

</p><div class="wp-block-image"><figure class="aligncenter"><img src="https://www.webdesign.org/img_articles/20670/17.jpg" alt="img"/></figure></div><h3 class="wp-block-heading">Step 9</h3><p>
In this era, film typography was almost entirely hand-drawn. As a result, alignment always had a bit of variation and was never grid-like or technical.

Set the rest of your text using Balloon/Bazooka and Kaufmann as shown in the example, using the Warp and Rotate techniques to give the text that slightly hand-drawn feel. Experiment with different letter positioning to mimic various styles of the 1930&#8217;s and give your image a unique look.

</p><div class="wp-block-image"><figure class="aligncenter"><img src="https://www.webdesign.org/img_articles/20670/18.jpg" alt="img"/></figure></div><p>

Add a subtle Drop Shadow effect to the text layers in the bottom half of the image, using a low Opacity around 16%.
</p><h3 class="wp-block-heading">Step 10</h3><p> Add a final touch, the registration mark, by using a semi-narrow sans-serif font. I chose a premium font called Futura, which is another original font from the 1930s, but a <a href="https://www.cufonfonts.com/font/miso" target="_blank" rel="noreferrer noopener">free font like Miso</a> will work just as well. Registration marks were handwritten often back then, so you could even write it in yourself, or use a handwritten font that is not too fancy. </p><div class="wp-block-image"><figure class="aligncenter"><img src="https://www.webdesign.org/img_articles/20670/19.jpg" alt="img"/></figure></div><h3 class="wp-block-heading">Step 11</h3><p>
Click on &#8220;Layer >; Merge Visible.&#8221; Right-click your new single layer and choose &#8220;Duplicate Layer.&#8221; Click &#8220;Filter >; Blur >; Gaussian Blur&#8221; in the main Photoshop menu and set the Radius to 6. Reduce the layer Opacity to 25% to give your finished image a soft &#8220;screen glow.&#8221;

View my finished wallpaper here:

</p><div class="wp-block-image"><figure class="aligncenter"><img src="https://www.webdesign.org/img_articles/20670/20_770.jpg" alt="img"/></figure></div><hr class="wp-block-separator has-css-opacity is-style-wide"/><p>In conclusion, creating vintage movie intro wallpaper with Photoshop is a fun and creative way to add a personalized touch to any space. With its easy-to-use tools and wide array of options, Photoshop is the perfect program to create some stunning visuals. Plus, you can save these images as wallpapers to use time and time again. So if you&#8217;re looking for something new, why not give this project a try?</p>
Create a Vintage Movie Intro Wallpaper in Photoshop