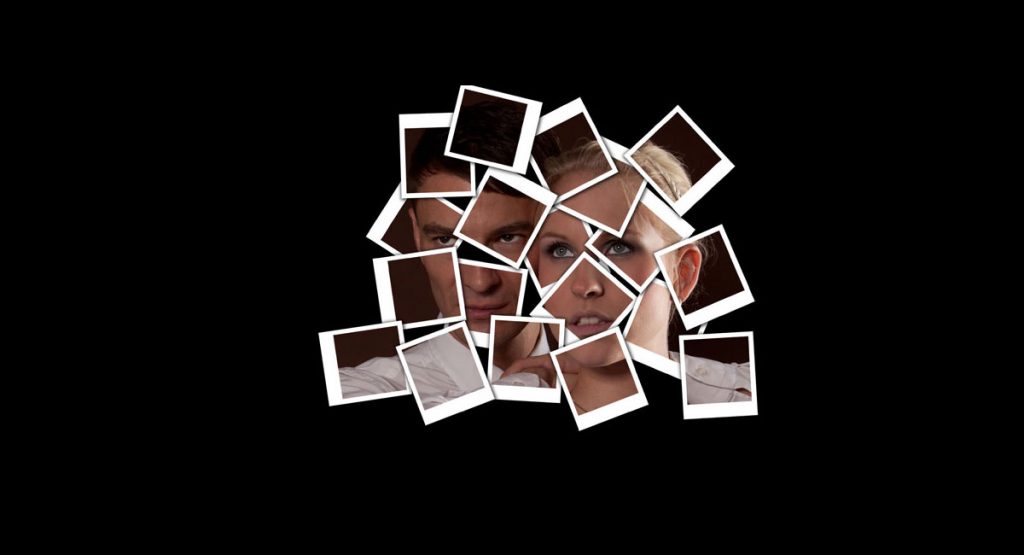
<p>If you&#8217;re looking for a fun and creative way to display your favorite photos, consider making a collage out of a single photograph. With the right tools and techniques, you can transform an ordinary picture into a stunning piece of art that showcases multiple images at once.</p><p>If you have any such Photograph with you, why not make it special and frame it so that it remains in front of your eyes forever. Here we will learn how to convert an image into a collage. We have used Polaroid photo frame look which will make your Photograph look stunning. You can click on the images to view larger version. </p><p>To get started, choose a photo that has plenty of visual interest and detail. This could be anything from a landscape scene to a portrait or still life composition. Next, use software like <a href="http://blog.visibledev.net/category/tutorials/adobe-photoshop/">Photoshop</a> to create multiple copies of the same image in different sizes and orientations.</p><ul class="wp-block-list"><li><strong>Skill</strong>: Easy</li>

<li><strong>Time</strong>: 1 hour(s)</li>

<li><strong>Software(s)</strong>: Adobe Photoshop CS4</li></ul><div class="wp-block-image"><figure class="aligncenter"><a class="imgHover" href="http://slodive.com/wp-content/uploads/etuts/2012/ps/collage/couple-org.jpg"><img src="http://slodive.com/wp-content/uploads/etuts/2012/ps/collage/couple.jpg" alt="collage"/></a></figure></div><div class="wp-block-image"><figure class="aligncenter"><a class="imgHover" href="http://slodive.com/wp-content/uploads/etuts/2012/ps/collage/collage.jpg"><img src="http://slodive.com/wp-content/uploads/etuts/2012/ps/collage/collage.jpg" alt="collage"/></a></figure></div><p class="has-text-align-center"><a rel="nofollow noopener noreferrer" href="http://imgur.com/jGGX5" target="_blank" class="rank-math-link"><em><strong>Image Source</strong></em></a></p><p>
If you like this article, you might be interested in some of our other articles on <a href="http://slodive.com/category/photoshop/" target="_blank" rel="noopener noreferrer"><strong>Photoshop</strong></a>.
</p><h3 class="wp-block-heading">Step 1</h3><p>
Open Image in Photoshop.
</p><div class="wp-block-image"><figure class="aligncenter"><a class="imgHover" href="http://slodive.com/wp-content/uploads/etuts/2012/ps/collage/step1-open-image-org.jpg"><img src="http://slodive.com/wp-content/uploads/etuts/2012/ps/collage/step1-open-image.jpg" alt="open image"/></a></figure></div><h3 class="wp-block-heading">Step 2</h3><p>
Duplicate the original layer <strong>(Ctrl+J)</strong>.
</p><div class="wp-block-image"><figure class="aligncenter"><a class="imgHover" href="http://slodive.com/wp-content/uploads/etuts/2012/ps/collage/step2-duplicate-layer-org.jpg"><img src="http://slodive.com/wp-content/uploads/etuts/2012/ps/collage/step2-duplicate-layer.jpg" alt="duplicate layer"/></a></figure></div><h3 class="wp-block-heading">Step 3</h3><p>
Add a new layer between the original layer and the duplicate layer (created in step 2) and fill it with black color.
</p><div class="wp-block-image"><figure class="aligncenter"><a class="imgHover" href="http://slodive.com/wp-content/uploads/etuts/2012/ps/collage/step3-add-black-layer-org.jpg"><img src="http://slodive.com/wp-content/uploads/etuts/2012/ps/collage/step3-add-black-layer.jpg" alt="add black layer"/></a></figure></div><h3 class="wp-block-heading">Step 4</h3><p> Create a new layer above the black layer. Select your <strong>Marquee tool (M)</strong> and make a selection. </p><div class="wp-block-image"><figure class="aligncenter"><a class="imgHover" href="http://slodive.com/wp-content/uploads/etuts/2012/ps/collage/step4-make-selection-org.jpg"><img src="http://slodive.com/wp-content/uploads/etuts/2012/ps/collage/step4-make-selection.jpg" alt="make selection"/></a></figure></div><h3 class="wp-block-heading">Step 5</h3><p>
Fill your selection with black color (you can fill it with any color) in the new layer created in the last step.Note that no change has occurred as the layer is below our duplicate layer (Don’t worry about this as it will appear soon enough).
</p><div class="wp-block-image"><figure class="aligncenter"><a class="imgHover" href="http://slodive.com/wp-content/uploads/etuts/2012/ps/collage/step5-paint-black-org.jpg"><img src="http://slodive.com/wp-content/uploads/etuts/2012/ps/collage/step5-paint-black.jpg" alt="paint black"/></a></figure></div><h3 class="wp-block-heading">Step 6</h3><p>
Select the duplicate layer and go to <strong>menu bar>; Layer>; Create clipping Mask</strong>This will shift your layer to right and show a downward arrow next to it(With this tool we basically mask the area that is just below our layer).
</p><div class="wp-block-image"><figure class="aligncenter"><a class="imgHover" href="http://slodive.com/wp-content/uploads/etuts/2012/ps/collage/step6-craete-clipping-mask-org.jpg"><img src="http://slodive.com/wp-content/uploads/etuts/2012/ps/collage/step6-craete-clipping-mask.jpg" alt="create clipping mask"/></a></figure></div><h3 class="wp-block-heading">Step 7</h3><p>
To make a boundary for our image, create a new layer just above our black layer.Make a selection such that it’s just a bit bigger than our masked area and fill it with white color.I made the base a little thicker so as to give it a Polaroid photo frame look.
</p><div class="wp-block-image"><figure class="aligncenter"><a class="imgHover" href="http://slodive.com/wp-content/uploads/etuts/2012/ps/collage/step7-make-boundary-org.jpg"><img src="http://slodive.com/wp-content/uploads/etuts/2012/ps/collage/step7-make-boundary.jpg" alt="make boundary"/></a></figure></div><h3 class="wp-block-heading">Step 8</h3><p> Create a shadow to your frame by editing the layer style (Double click on your frame layer) of your frame layer Here I used Drop Shadow:Angle: 140 degrees distance: 4 pixels spread: 19%Size 24 pixelsYou won’t see any changes due to the black layer present below. </p><div class="wp-block-image"><figure class="aligncenter"><a class="imgHover" href="http://slodive.com/wp-content/uploads/etuts/2012/ps/collage/step8-create-shadow-org.jpg"><img src="http://slodive.com/wp-content/uploads/etuts/2012/ps/collage/step8-create-shadow.jpg" alt="create shadow"/></a></figure></div><h3 class="wp-block-heading">Step 9</h3><p>
Link your layers (White frame layer and black mask layer) by selecting both the layers and clicking the link layer button at the bottom left side of your layer palette.
</p><div class="wp-block-image"><figure class="aligncenter"><a class="imgHover" href="http://slodive.com/wp-content/uploads/etuts/2012/ps/collage/step9-link-layers-org.jpg"><img src="http://slodive.com/wp-content/uploads/etuts/2012/ps/collage/step9-link-layers.jpg" alt="link layers"/></a></figure></div><h3 class="wp-block-heading">Step 10</h3><p>
Now select your frame layer and rotate and move it to any place with the free transform tool (Ctrl+T).Note that only our mask and frame are moving and not the image.
</p><div class="wp-block-image"><figure class="aligncenter"><a class="imgHover" href="http://slodive.com/wp-content/uploads/etuts/2012/ps/collage/step10-free-taransform-org.jpg"><img src="http://slodive.com/wp-content/uploads/etuts/2012/ps/collage/step10-free-taransform.jpg" alt="free transform"/></a></figure></div><h3 class="wp-block-heading">Step 11</h3><p>
Now group the three layers (White Frame Layer, Black mask layer and the top image layer) into one group <strong>(Ctrl + G)</strong>.Name this group Polaroid.
</p><div class="wp-block-image"><figure class="aligncenter"><a class="imgHover" href="http://slodive.com/wp-content/uploads/etuts/2012/ps/collage/step11-group-layers-org.jpg"><img src="http://slodive.com/wp-content/uploads/etuts/2012/ps/collage/step11-group-layers.jpg" alt="group layers"/></a></figure></div><h3 class="wp-block-heading">Step 12</h3><p>
Now Duplicate your Polaroid group and place the frame and mask layer to a different position and rotate them to any other angle, to give it collage feel.
</p><div class="wp-block-image"><figure class="aligncenter"><a class="imgHover" href="http://slodive.com/wp-content/uploads/etuts/2012/ps/collage/step12-duplicate-group-org.jpg"><img src="http://slodive.com/wp-content/uploads/etuts/2012/ps/collage/step12-duplicate-group.jpg" alt="duplicate group"/></a></figure></div><h3 class="wp-block-heading">Step 13</h3><p>
Arrange effectively to give it a nice collage look.For this tutorial I took 17 groupsYou can add more if you want.
</p><div class="wp-block-image"><figure class="aligncenter"><a class="imgHover" href="http://slodive.com/wp-content/uploads/etuts/2012/ps/collage/step13-arrange-effectively-org.jpg"><img src="http://slodive.com/wp-content/uploads/etuts/2012/ps/collage/step13-arrange-effectively.jpg" alt="arrange effectively"/></a></figure></div><h3 class="wp-block-heading">Step 14</h3><p>
It could be quite challenging to find a particular layer in so many layers, for that you can use the auto select layer control available on top left hand corner of your screen when you are using the <strong>select tool (V)</strong>. This will help you find and edit the layers at a later stage.
</p><div class="wp-block-image"><figure class="aligncenter"><a class="imgHover" href="http://slodive.com/wp-content/uploads/etuts/2012/ps/collage/step14-selecting-layers-org.jpg"><img src="http://slodive.com/wp-content/uploads/etuts/2012/ps/collage/step14-selecting-layers.jpg" alt="selecting layers"/></a></figure></div><h3 class="wp-block-heading">Final Result</h3><div class="wp-block-image"><figure class="aligncenter"><a class="imgHover" href="http://slodive.com/wp-content/uploads/etuts/2012/ps/collage/collage.jpg"><img src="http://slodive.com/wp-content/uploads/etuts/2012/ps/collage/collage.jpg" alt="collage"/></a></figure></div><hr class="wp-block-separator has-css-opacity is-style-wide"/>
Make a Collage out of Single Photograph
