<p>If you&#8217;re looking to create a stylish blue VCard layout in Photoshop, then you&#8217;ve come to the right place. Whether you&#8217;re a freelancer or business owner, having a well-designed VCard can make all the difference when it comes to making an impression on potential clients and customers. With Photoshop, it&#8217;s easier than ever to craft a professional-looking VCard that reflects your brand&#8217;s unique style.</p><p>Promoting yourself on the internet, which is the biggest place where you can do it, is a great idea. Actually, is a must if you`re working on the internet as a freelancer, for example. There are many ways to do it, through personal websites, portfolios, online CV and virtual cards or vCards. I decided to design a nice and clean vCard in Photoshop and I`m going to explain you step by step what you need to know to build your own vCard. </p><p>VCard is a digital business card that contains all the necessary information about an individual, such as their name, contact details, and other relevant information. It serves as a modern replacement for traditional paper business cards. With the help of <a href="http://blog.visibledev.net/category/tutorials/adobe-photoshop/">Photoshop</a>, it is possible to create an attractive VCard layout that reflects your brand and personality.</p><h2 class="wp-block-heading">Design VCard Layout In Photoshop</h2><p>To design a professional-looking VCard layout in Photoshop, you need to start by selecting the appropriate layout and color scheme. A <a href="https://creativemarket.com/blog/minimalist-design-trend" target="_blank" rel="noreferrer noopener">minimalist design</a> with simple colors such as black, white, or grey works well for most professionals. You can add a splash of color or texture to make it stand out from the crowd.</p><h3 class="wp-block-heading">Step 1</h3><p>
Create a new file, and name it “vcard”. Give the width : 922px and height : 780px
</p><div class="wp-block-image"><figure class="aligncenter"><img src="http://ibrandstudio.com/wp-content/uploads/2010/07/18.jpg" alt="Create vcard" class="wp-image-342"/></figure></div><p>

Now, let’s we make a layout with a width 500px, the first step is create a guides, open View >; New Guide, in the box that pops open select vertical and enter 211px.
</p><div class="wp-block-image"><figure class="aligncenter"><img src="http://ibrandstudio.com/wp-content/uploads/2010/07/2a.jpg" alt="Create vcard" class="wp-image-343"/></figure></div><p>

Then go to View >; New Guide, in the box that pops open select vertical and enter 711px.
</p><div class="wp-block-image"><figure class="aligncenter"><img src="http://ibrandstudio.com/wp-content/uploads/2010/07/2b.jpg" alt="Create vcard" class="wp-image-344"/></figure></div><h3 class="wp-block-heading">Step 2</h3><p>
Apply the gradient to your “background” layer. When applying the gradient start from the top-middle of the canvas and drag half way down, this should give us a nice sized effect. If you hold down the Shift key while dragging the gradient down it will lock the gradient line vertically.

</p><div class="wp-block-image"><figure class="aligncenter"><img src="http://ibrandstudio.com/wp-content/uploads/2010/07/31.jpg" alt="Create vcard" class="wp-image-345"/></figure></div><div class="wp-block-image"><figure class="aligncenter"><img src="http://ibrandstudio.com/wp-content/uploads/2010/07/3b.jpg" alt="Create vcard" class="wp-image-346"/></figure></div><h3 class="wp-block-heading">Step 3</h3><p>
Next is to make the object box, using the rounded rectangle tool, Width: 500px, Height: 500px, Radius: 10px, dan Color: white (#ffffff)
</p><div class="wp-block-image"><figure class="aligncenter"><img src="http://ibrandstudio.com/wp-content/uploads/2010/07/42.jpg" alt="Create a vcard" class="wp-image-347"/></figure></div><p> Now add these layer styles, change the Fill of Opacity to 20%, add Drop Shadow, Inner Shadow, and Gradient Overlay </p><div class="wp-block-image"><figure class="aligncenter"><img src="http://ibrandstudio.com/wp-content/uploads/2010/07/4a.jpg" alt="Create a vcard" class="wp-image-348"/></figure></div><div class="wp-block-image"><figure class="aligncenter"><img src="http://ibrandstudio.com/wp-content/uploads/2010/07/4b.jpg" alt="Create a vcard" class="wp-image-349"/></figure></div><p>

Then edit Gradient on Gradient Overlay
</p><div class="wp-block-image"><figure class="aligncenter"><img src="http://ibrandstudio.com/wp-content/uploads/2010/07/4c.jpg" alt="Create a vcard" class="wp-image-350"/></figure></div><h3 class="wp-block-heading">Step 4</h3><p>
The next step, duplicate the rectangle layer using [ ctrl ]+[ j ] or choose menu layer >; Duplicate Layer, then send backward layer using [ ctrl ]+[ [ ].

Next, sliding down the object.
</p><div class="wp-block-image"><figure class="aligncenter"><img src="http://ibrandstudio.com/wp-content/uploads/2010/07/5a.jpg" alt="Create a vcard" class="wp-image-351"/></figure></div><p>

Change the fill of Opacity to 20%, and edit the layer style.
</p><div class="wp-block-image"><figure class="aligncenter"><img src="http://ibrandstudio.com/wp-content/uploads/2010/07/5b.jpg" alt="Create a vcard" class="wp-image-352"/></figure></div><div class="wp-block-image"><figure class="aligncenter"><img src="http://ibrandstudio.com/wp-content/uploads/2010/07/5c.jpg" alt="Create a vcard" class="wp-image-353"/></figure></div><h3 class="wp-block-heading">Step 5</h3><p>
Again, duplicate the rectangle layer using [ ctrl ]+[ j ] or choose menu layer >; Duplicate Layer, then send backward layer using [ ctrl ]+[ [ ].
Then change Fill Opacity to 0%, and edit layer style.
</p><div class="wp-block-image"><figure class="aligncenter"><img src="http://ibrandstudio.com/wp-content/uploads/2010/07/6a.jpg" alt="Create a vcard" class="wp-image-358"/></figure></div><h3 class="wp-block-heading">Step 6</h3><p>
Now we’ll make the header, the first step is add your name at this header
</p><div class="wp-block-image"><figure class="aligncenter"><img src="http://ibrandstudio.com/wp-content/uploads/2010/07/7a.jpg" alt="Create a vcard" class="wp-image-359"/></figure></div><p>

Change the Fill of opacity to 50%, and edit the layer style.
</p><div class="wp-block-image"><figure class="aligncenter"><img src="http://ibrandstudio.com/wp-content/uploads/2010/07/7b.jpg" alt="Create a vcard" class="wp-image-360"/></figure></div><div class="wp-block-image"><figure class="aligncenter"><img src="http://ibrandstudio.com/wp-content/uploads/2010/07/7c.jpg" alt="Create a vcard" class="wp-image-361"/></figure></div><p>

Then, please add a little description about us.
</p><div class="wp-block-image"><figure class="aligncenter"><img src="http://ibrandstudio.com/wp-content/uploads/2010/07/7d.jpg" alt="Create a vcard" class="wp-image-362"/></figure></div><p>

Creat two lines below the title (your name) with a height 1px, for the first line give the color: #95b6c3 dan the second line color: #dcf2fa.
</p><div class="wp-block-image"><figure class="aligncenter"><img src="http://ibrandstudio.com/wp-content/uploads/2010/07/7e.jpg" alt="Create a vcard" class="wp-image-363"/></figure></div><div class="wp-block-image"><figure class="aligncenter"><img src="http://ibrandstudio.com/wp-content/uploads/2010/07/7f.jpg" alt="Create a vcard" class="wp-image-364"/></figure></div><p>

Then we add the logo and label to the righ side.
</p><div class="wp-block-image"><figure class="aligncenter"><img src="http://ibrandstudio.com/wp-content/uploads/2010/07/7g.jpg" alt="Create a vcard" class="wp-image-365"/></figure></div><h3 class="wp-block-heading">Step 7</h3><p>
Now we add some heading text “About Me”.
</p><div class="wp-block-image"><figure class="aligncenter"><img src="http://ibrandstudio.com/wp-content/uploads/2010/07/8a.jpg" alt="Create a vcard" class="wp-image-366"/></figure></div><p>

Then change the Fill of Opacity to 70%, and edit the layer style
</p><div class="wp-block-image"><figure class="aligncenter"><img src="http://ibrandstudio.com/wp-content/uploads/2010/07/8b.jpg" alt="Create a vcard" class="wp-image-367"/></figure></div><p>

Next please add some text below the heading “About Me”
</p><div class="wp-block-image"><figure class="aligncenter"><img src="http://ibrandstudio.com/wp-content/uploads/2010/07/8c.jpg" alt="Create a vcard" class="wp-image-368"/></figure></div><p>

And create a dividing lines, like that we created on step 6
</p><div class="wp-block-image"><figure class="aligncenter"><img src="http://ibrandstudio.com/wp-content/uploads/2010/07/8d.jpg" alt="Create a vcard" class="wp-image-369"/></figure></div><h3 class="wp-block-heading">Step 8</h3><p>
Create some heading text again, below the lines with same style as on step 7
</p><div class="wp-block-image"><figure class="aligncenter"><img src="http://ibrandstudio.com/wp-content/uploads/2010/07/9a.jpg" alt="Create a vcard" class="wp-image-370"/></figure></div><p>

Give some text below the heading “Links”, change the Fill of Opacity to 80%
</p><div class="wp-block-image"><figure class="aligncenter"><img src="http://ibrandstudio.com/wp-content/uploads/2010/07/9b.jpg" alt="Create a vcard" class="wp-image-371"/></figure></div><p>

Give the dividing lines
</p><div class="wp-block-image"><figure class="aligncenter"><img src="http://ibrandstudio.com/wp-content/uploads/2010/07/9c.jpg" alt="Create a vcard" class="wp-image-372"/></figure></div><p>

And add the icon like teh picture below
</p><div class="wp-block-image"><figure class="aligncenter"><img src="http://ibrandstudio.com/wp-content/uploads/2010/07/9d.jpg" alt="Create a vcard" class="wp-image-373"/></figure></div><h3 class="wp-block-heading">Step 9</h3><p> Again let’s create some heading “Skills” text with the same style as on step 7 </p><div class="wp-block-image"><figure class="aligncenter"><img src="http://ibrandstudio.com/wp-content/uploads/2010/07/10a.jpg" alt="Create a vcard" class="wp-image-374"/></figure></div><p>

Then add some text, change the Fill of Opacity to 80%
</p><div class="wp-block-image"><figure class="aligncenter"><img src="http://ibrandstudio.com/wp-content/uploads/2010/07/10b.jpg" alt="Create a vcard" class="wp-image-375"/></figure></div><p>

Give the dividing lines
</p><div class="wp-block-image"><figure class="aligncenter"><img src="http://ibrandstudio.com/wp-content/uploads/2010/07/10c.jpg" alt="Create a vcard" class="wp-image-376"/></figure></div><p>

And add the icon like the picture below
</p><div class="wp-block-image"><figure class="aligncenter"><img src="http://ibrandstudio.com/wp-content/uploads/2010/07/10d.jpg" alt="Create a vcard" class="wp-image-377"/></figure></div><h3 class="wp-block-heading">Step 10</h3><p>
Finally, for the last step is create a footer. We’ll add some text and change the Fill of Opacity to 80%
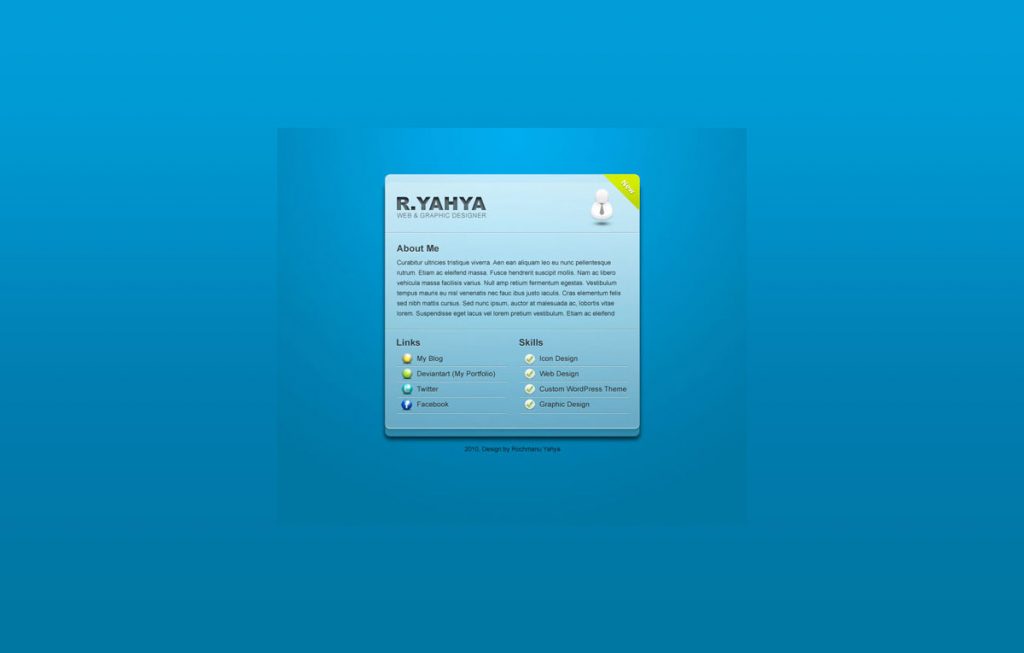
</p><div class="wp-block-image"><figure class="aligncenter"><img src="http://ibrandstudio.com/wp-content/uploads/2010/07/10e.jpg" alt="Create a vcard" class="wp-image-378"/></figure></div><h3 class="wp-block-heading">Conclusion</h3><p> There we have it! Hopefully, you should have something like this: </p><div class="wp-block-image"><figure class="aligncenter"><img src="http://ibrandstudio.com/wp-content/uploads/2010/07/finish.jpg" alt="Stylish Blue VCard Layout In Photoshop" class="wp-image-336"/></figure></div><hr class="wp-block-separator has-css-opacity is-style-wide"/><p></p>
How to Design a Stylish Blue VCard Layout In Photoshop